Author Archive
 Been there done that but it seems I am now doing it again!
In quest to be frugal and when ham bucks are needed for a purchase I have in the past taken a look around the shack and put up for sale items that I just were not using or felt I would no long need. Way to often I have found this practice has bitten me more than one time. How many of you have sold a piece of equipment to later find you need it!
I have done that with too many items and it can get very frustrating but I do have to understand that in some cases the new piece of gear that was purchased would never had happened if I did not liquidate some gear. Here are some of the items I have sold and turned around to only purchase the same item later on down the line. LG auto tuner, external SWR meter, noise cancelling unit, antenna switch, Asus Xonar U7 external sound card and the list goes on. Actually it goes on to my most recent purchase the K1EL Winusb keyer, yup had one and sold it and now I need it.
How many of you out there have done the same thing? I have now learned my lesson as I am keeping on my self the external SWR meter, antenna switch and Astron power supply just in case I need them. I have become a ham horder.
 Hold on folks!
Now that I am retired long weekends seem to sneak up on me as when I was working it seemed they never could come fast enough. As with CW contesting they just don't seem to come fast enough but space weather has a way of sneaking up and spoiling the contest....well that is what I used to think anyway. In the past, I would faithfully check out the space weather to get a sniff of upcoming conditions for a weekend contest. If things looked rough I would either skip the contest or dip my toes in it just to see how the ride would go.
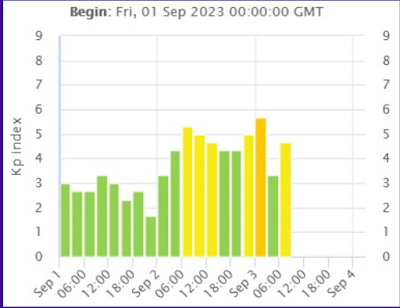
Recently I have changed my outlook on the dreaded solar storms. This weekend was the CWops open contest and it is divided into 3 sessions. I took part in the 2nd session only as I had other things on my agenda for the weekend. From 9 am local time to 1 pm is session 2 I jumped in even with a Kp index of 5. I understood it was going to be rough, and I most likely will not beat last year's score but I have decided to use the poor conditions to hone my CW skills.
In the past when calling CQ contest and having a station come back to me who was almost non-existent and fading in and out I struggled. Now I have the opportunity thanks to the poor solar conditions to practice this skill! I had a ton of fish on 40m and 20m just waiting for me to dig them out of the mud and toss and turn with them as we both faded in and out.
That was how I spent my 4 hours in session 2 of the CWops CW open contest. My score was not the greatest but that was not my goal and considering the poor conditions I would have been frustrated. Instead, I used it as a learning session to work weak and fading stations. When I say weak at times their signal was not even moving my S meter and fading as well.
Below is my final score and I ended up operating for 3 of the 4 hours as I started late by 30 minutes and I took some breaks.
 Blogger issue solved I can now add followers.
 |
| Here are the steps I followed |
Way back on August 15, I asked my readers a question regarding my blog not being able to add new blogs to follow. From the comments, some had the same issue as well when trying to add a new blog to follow. My blog is also re-posted on Amateurradio.com and on this site, Rick KE6LL wondered if somehow the blog was limited to how my blogs I could follow. I have seen other Blogger blogs that did have more followed blogs than me and it got me thinking about his question.
To make a long story short I was able to fix the issue and here is what I did:
1. I signed into my blog and on the sidebar I clicked on "Theme"
2. I clicked on customize and selected "Edit HTML"
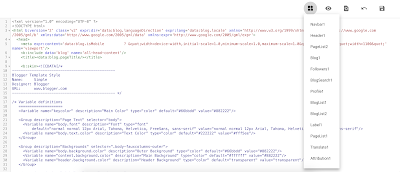
3. In the top left corner I selected the first icon with 3 squares and a diamond. Put your mouse over it and it reads "Jump to Widget" and click on it.
Jump to widget icon
4. In the list you have "blog list 1" and "blog list 2" You may just have blog list one but I have one and two.
5. I clicked on blog list one and the HTML came to life for that widget. Now look for "<b:widget-setting name='numItemsToShow'>10</b:widget-setting>" It should be very close to the top. Notice the number shown in on this line. If it is 5 change it to 10 which I did not have to do as it was already 10. If you do have to change it then click on the floppy disk icon in the top right corner to save the changes.
6. Now click the Jump widget again and go to blog list two and in the HTML look for the same HTML code. In my case, this read 5 and not 10. I changed it to 15. "<b:widget-setting name='numItemsToShow'>15</b:widget-setting>" Then click the same floppy icon and sign out of your blog and sign back in again.
I then tried to add a new blog to my blog roll and I had no issues in doing so. I did at first change it to 10 and tried it and things worked so I went back in and tried 15 and all was still good so I stayed with 15.
Now a word of caution...BEFORE YOU BEGIN SAVE A BACKUP COPY OF YOUR PRESENT BLOG. As we all know if things can go wrong they will play things on the safe side.
Rick KE6LL thanks very much for getting me thinking in the right direction.
 |
| HTML changed to 15 |
 Reverse Beacon Network surprises
Last weekend I took part in the WAE DX CW contest and most of the time when I calling "CQ contest" on my second monitor I have the RBN or reverse beacon network up and running. The main reason for doing this to see where my signal is reaching and if it is targeting in the case of the WAE contest Europe. Now and then I see my signal has been spotted in both interesting places and far away places. This contest was no different, on Sunday morning I was spotted in New Zealand by ZL3X multiple times from 4dB to 11dB, VY0ERC in Eureka in Nunavut at 7dB and finally 5W1SA in Samoa at 8dB. Nice to know my 100 watts are getting out there!
 Question for those who use Blogger.
Good afternoon fellow Bloggers, I have been having an issue for some time now and have just ignored it. The time has come to see if something is up at my end or if others using Blogger have this same issue. I have searched the internet and the Blogger site regarding the issue. There has been advice but nothing has worked.
The issue is I want to add a blog to my blog list and I attempt this as follows:
1. I visit the home page of the blog I want to follow and copy the URL.
2. In my blog I go to (Blogger blog) and click on Layout.
3. In the layout I have a gadget called "Blogs I follow" and I click on edit.
4. This shows me all the blogs I follow and when I scroll to the end of the list I am given an option to "add a new item"
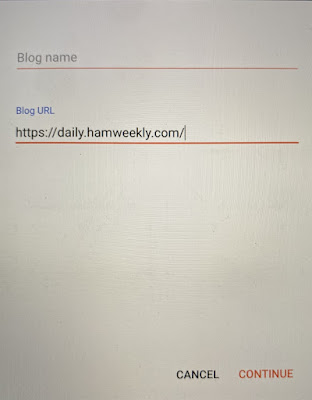
5. I click on "add new item" paste the blog URL on the line called "blog URL" and click continue.
In the past when I did this the name of the blog I want to follow would populate in the line above the blog URL and then ask me again if I wanted to save it. I clicked yes and it was done. For some time now I add the URL of the blog I want to follow and click save and the message I get is "Could not detect a feed" I do have the option to click ok but I am informed that I can still click "ok" but if I do the time and date will not be shown....whatever that is. So I click anyway the complete URL is shown but now the only option I have is to cancel it and I am not given the option to save it. Not sure why this is happening.
 Part 3 Try and try again….
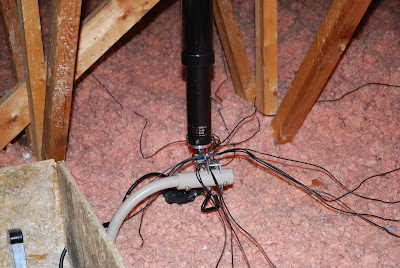
In this final segment of antenna challenges, I want to take a look at some of the successes and failures. One antenna I tried was a screwdriver antenna ( High Sierra Sidekick) mounted in the attic with ground radials but for some reason, I was never able to get a good SWR.
I then moved it outside at the side of our deck steps as I did not want the condo police to see it. With this setup I needed to setup and take down the antenna each time it was used. To speed things up I buried the coax to the mounting location and I had a piece of 90-degree conduit attached to the deck step and it would swing out when I wanted to mount the antenna.Sidekick outside.
The mount I used was called a Jawmount this allow fast install and take down. I also buried the radials in the ground around the deck and out into the yard. This setup also meant I had to keep the snow cleared on the deck steps and around the antenna mounting position. In the end I wanted to have something more stealth and had better results as well as less trips out doors.
My next idea was the gutter and what I did here was used the center conductor from the coax and the braid was attached to the radials I used for the screwdriver antenna. The Elecraft K3 tuner was able to tune the gutter but I had a lot of noise and issues getting out. So it was back to the ground-mounted screwdriver antenna for now.
I also tried just plain old portable operation from home as well but that would be limited to summer time only. I set up on my deck using the Elecraft KX1 with the miracle whip antenna and also a portable mag loop. This was a nice setup with decent results but was limited to summers with nice days.
The next idea I just can't believe I even did but I did and it worked very well. In the townhouse complex we lived in our cars were parked in a common parking lot we had no garage or driveway. Our home backed onto a large green space that connected to this parking lot. The gears in my head started turning..if I could get coax from the back of the house through the field to the car parked in the parking lot I then could put an HF antenna on the car and I would be good to go! Now that I look back I just can't believe I did this but I did. I purchased a large HF mobile multi-band vertical the Valor ProAm AB-5. Now it gets really good...I was able to get free from work 3/4 inch poly pipe. I rolled it out and bury about 60 feet of it in the green space almost to the car. Now that was a lot of work and done in such a way that it did not attract attention....don't ask.....Anyway fed LMR 400 in the pipe that I purchased cheaply at a flea market. The poly pipe was connected to a plastic waterproof box and the LMR 400 was terminated to an SO-239. When I wanted to get on the air I place the antenna on the car via a trunk lip mount and ran some RG8X from the antenna to the box where the LMR was terminated. This worked great for years and I was very fast at putting it up and down.Portable deck ops
Well as they say all good things come to an end...I came home from work one day to find the city decided to put a walking path in the green space and in the process dug up my poly pipe and LMR 400. I am guessing they had no idea what it was. They had already left for the day as I arrived home so it was time to move fast! I pulled out all the LMR 400 coax and removed from the ground about 15 feet of poly pipe that was close to the townhouse. Well, it was good while it lasted but now it was time to start thinking again.
This was when I came up with the idea of the Alpha Delta in the attic (See part 1 in this series) Well that is it for my restricted antenna adventures and I hope you enjoyed and possibly came away with some ideas.
Side note: Not sure what is going on with some of the text sizing in the post I tried to fix it and just ended up with more issues. Sorry for the sections of smaller print.
 Part 2: Condo antenna challenges.
 |
| The MFJ loop covered and ready to go into service. |
In part 2 of antenna challenges, I want to dive into living in a condo and getting on the air. Many amateur operators at some time have found themselves moving into an apartment to save for a home or downsizing into a condo when the house has grown too big.
This lifestyle does not mean the radio hobby is tossed. Most of us find our radio hobby adds pleasure to one's day. For me when I was in a condo it meant just another hurdle to overcome toward getting on the air. In my readings, I have seen hams who have erected wire, mobile whips and so on. I have never tried any of these and if you have please do share what you have tried. The condos that I have lived in were heavy on condo cop protection and the list was long as to what could and could not be on a balcony. One of the items on the list was antennas and as for me, I look at that as where there is a will there is a way!
 |
| Yearly checkup |
In all the condos I have lived in I have always had a balcony to take advantage of for an antenna. After investigating many antennas the best solution (a pricey solution) was a mag loop antenna for the balcony. It offered a small size, if needed it could be taken in and out from the balcony and as well its multi-band antenna. In the past, I have had mag loops such as an AEA isoloop, Chameleon P-loop and Alex loop. I planned to leave the loop on the balcony and not have to run in and out to tune the loop. I ended up purchasing the MFJ 1786 mag loop and this loop gave me the desired remote band tuning I wanted. I then purchased a tripod to mound the loop and next was how to conceal the loop. I ended up getting a patio furniture cover which looked great and to the condo cops, it was just another piece of patio furniture on the balcony. I was thrilled the cover did not affect the SWR at all as I was prepared to remove the cover during operation and then cover it once done. The mag loop had to be moved around the balcony for the best overall SWR. This took some time and once done I marked the balcony floor with a permanent marker. Also in the front of the loop is a round copper wire and by changing its shape also can help with improving the SWR.
 |
| Changing the shape improves SWR |
This way when it was stored in the corner during non-use I was able to put it in the right spot for best operation. The loop was very fussy and putting the loop in the exact spot was important for the best possible SWR. The loop was tried both in the vertical and horizontal position. I was not able to get a decent SWR when the loop was mounted vertical. I ended up using it in the horizontal position. This was also great for the cover as it looked like a patio table I was covering. I used the Comet CTC-50M (flat coax cable) to feed out the sliding glass door so the coax would be permanent as well. This setup allowed me to place the antenna in position and start operating. Again in this configuration, I was strictly CW and I also added digital communications as well. I admit it is not an ideal situation but it got me on the air and making contact.
In my third and final antenna challenge post I want to share some other antennas I have tried some failed, some worked and others were crazy and worked. After using the loop for a short while I became very fast at tuning the loop. I also found in the summer if the humidity was high it would affect the SWR. Once a year I took the loop in for an inspection and remove any bugs that made the loop home.


