 Build a $2 USB Radio Programming Cable
| Frustrated with that generic programming cable? This $2 solution might just be your ticket to sanity. | |||||||||
 | |||||||||
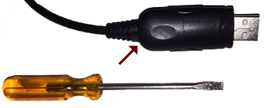
| Let’s See…You purchased a radio and programming cable, loaded the software, and that’s as far as you’ve gotten. You’re fighting with error messages: – Radio did not respond – Could not open COM port – Run Time Error and Windows (TM) 10 keeps changing your drivers.Now you do what many owners do. Put the radio in the drawer to be worked on later. This is like buying a rollaway treadmill and putting it in the closet until the next time you want to exercise. (NOT gonna happen)But wait, yours has the company name and logo right on the cable. – It doesn’t matter. Keep reading.There are a few options available, such as an FTDI cable. It’s truly Plug ‘n Play, and costs about $20.But here’s a project that just might solve the issue for around $2. All you need is a small flat blade screwdriver, a soldering pencil, and a CP2102 board. CP2102 The CP2102 is a USB to TTL UART chip. What? CP2102 boards can be found on eBay for around $2 and on Amazon. Here’s How Let’s start with that original cable.
Take a small screw driver and pry the open the case from the back where the cable enters.
It should only be snapped together.
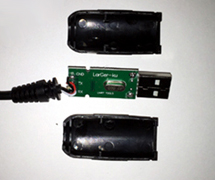
Unsolder the 3 wires connected to the board.
Solder the 3 wires to the corresponding terminals on the new board. Note 1: Some boards may have the TxD and RxD reversed. If it doesn’t work the first time, reverse the two wires. No damage has been done. Note 2: Some boards have pins on the back requiring small connectors. You can either remove the pins, solder to them, or use the connectors. Whatever floats your boat.
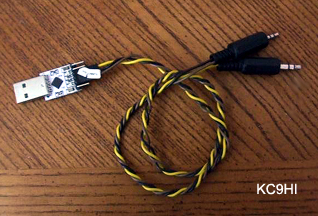
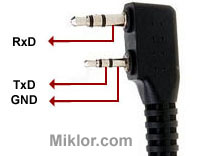
Driver If the driver is labeled CH340 instead of CP210x in Device Manager, that’s not a problem. Both chips are designed to do the same thing. But I don’t have a Cable If you don’t have a generic cable, you can use 2.5 and 3.5mm stereo jacks. Here are the pin outs, and what Jim’s (KC9HI) cable looks like.
Cosmetics If you are adventurous, try retrofitting the new board inside the original plastic housing. This will require a Dremel tool, X-Acto knife, Glue, and some patience, but it can be done. If the board only has 5 terminals instead of 6, it’s not an issue. You only need GND, TX and RX. Some come protected with a piece of clear heat shrink over the board so you can see the cool blinking lights. Note 3: If you are trying to retrofit the board inside an existing shell, the red board below is a bit shorter and easier to fit.
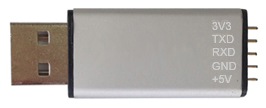
For a dollar or so more, you can find the same boards in a metal case.
What’s the Advantage – First and Foremost, it works. Take the radio out of the drawer, program it and have some fun. – Next, it only cost around $2 to save the generic cable from the trash. – Very Important – Bragging Rights. Now, when you go to a club meeting and someone says they can’t get their cable to work, tell them they can build their own, just as you did. I hope you had fun with this project. It’s super simple and very rewarding. I’ve made several and never had a failure. Say goodbye to driver issues.
|






This is an excellent article John. Its very practical and appeals to ‘my inner ham’!
I enjoyed your project John,I do not need the cable for now but I like to learn,Thank you.
Bob DW7NIB a retired US Marine/Vietnam Veteran/former C.E.T and Ham operator.73
Thank you both. I hope to have more small projects like this in the future.
The goal is to learn, grow, and teach others.
John
– http://www.miklor.com
If you want a professional molded plug and cable for your DIY project, order a cheapie headset like this ~$4 one and sacrifice it for the cable and connector.
http://www.amazon.com/Generic-Earpiece-Headset-Kenwood-2-Way/dp/B00E5W9VJK/ref=sr_1_14?ie=UTF8&qid=1440081548&sr=8-14&keywords=kenwood+mic
Good article, DIY is what we’re suposed to do, right?
The single biggest reason why many of the rig maker supplied cables don’t work, is that they use old (or non genuine) versions of the infamous Prolific USBSerial chipset. Some FTDI chips have also been counterfieted too!
Even the 100% genuine chipsets, of the early type now will not work with up-to-date Windows drivers. By design (and desire of Prolific.)
You can reload the drivers from the little CD that came with the rig+cable, if Windows will let you (usualy does.) But the next time Windows does an update, they will be swapped for the later versions, and your stock cable will die again.
Sadly, there are a lot of even the genuine, but old version chipset powered adapters out there, that now for most no longer work in Windows.
Linux (it appears) will still use them just fine, even the non genuined ones! Though how long that will last, is anyone’s guess.
Other choices, if you have a PC with “Real” COM ports, make up a cable using one of them… Or any other USBSerial adapter you have, that does work with Windows (or your OS of choice.)
73.
Dave G0WBX (G8KBV)
Hi
These seem to have TTL outputs and not RS232. Any experience with using these on radios that have RS232 ports?
Randy
After reading this, and having problems with my cable for Kenwood and Chinese radios I went out and brought 4 of them, total of NZ$10, including the postage.
Plugged in on my new Win10 Notebook and worked straight away. Have not tried to see if it will program, but Chirp and the Icom ID-51A software all saw the Com Port.
Plan now is to make it so I can plug different cable to it, and be able to switch out when I need a new cable to program a different radio.
If possible I need to see if it will work to program the Motorola radios, I have a GM-300, GP-328 I would like to program?
Thanks for the wonderful information, and like the others have said, this is what Ham Radio is all about building.
It should work with the Motorola’s using a 2.5mm plug.
As long as it requires the magic combo of GND RxD TxD, it should work fine.
Also I received this from Bob KV4NF regarding an RS-232 circuit.
http://www.miklor.com/COM/Project_232.php
John
– http://www.miklor.com
Hello. I baught a couple of tri-band (Baofang UV9s) radios for the marine band but decided to study for my ham lisence too. Wanted to start programing radios. As you mentioned, I bought a programing cable, but it did not work. Liked your method. Spent $15 on the parts, as everything came in packs of 4 or 5. Figured I would give some away. Soldered the 3 wires onto the plugs and slid the other ends over the pins on the USB board. Still does not recognize radios. Use Linux mostly, but have Windblows 10 machine if required. Tried both with purchased cable. Instructions say I should use Radioddity, but I don’t have that. I do show Baofang brand. This is one of the most frustrating things I have tried to do in a while. It doesn’t seem like it should be this difficult. Heaven help me if I ever get far enough allong to tune an antenna.