Archive for the ‘echolink’ Category
 Baofeng brothers
Back in February I bought a Baofeng UV-3R+. It came after an unusually long wait for products from China, in March. In that time, eBay vendors had begun advertising the new Baofeng UV-5R which had double the output power and a key-pad that could be used for DTMF. To add insult to injury the price of the 5R was less than I paid for the 3R+.
As the months passed the knowledge that the UV-5R could still be bought for an absurdly low price niggled away at me, until eventually I gave in and ordered one. Unlike its little brother the 5R got here in little more than a week. So now I have two Baofeng HTs. A ham can never have too many radios, especially at this price!
 |
| Baofeng UV-3R+ and UV-5R |
After I sold my original UV-3R to make way for the Plus I had a few regrets. The original had the advantage of being lightweight and tiny. Although the Plus was only a few millimetres larger and a few grams heavier the difference felt more marked. It lacked the cuteness of the earlier model. But the drop-in desk charger was a nice standard accessory. The accessory port was the same as used by Kenwood and Wouxun, enabling some standardization. It is a nice little radio but functionally almost identical to the original 3R.
 |
| Baofeng UV-5R unboxed |
The UV-5R is quite a big improvement over its little brother. It isn’t a lot bigger or heavier than the 3R+ but the extra size and weight gains you double the output power (4W compared with 2W) and a keypad which supports both frequency entry and DTMF. The latter makes the radio much more useful on Echolink.
The 5R feels solid and well built like the 3R+. In fact it feels like a radio that cost three times the price. I think Baofeng has hurt sales of the basic handhelds made by the Japanese “big 3.” Only rigs with ham radio specific extras like supporting D-Star or APRS will be able to justify a higher price. As neither of those things are useful for the typical Chinese business buyer of these radios I can’t see Baofeng starting to compete in that area. So Yaesu, Icom and Kenwood can breathe a sigh of relief.
Other things I like about the UV-5R are:
- 4W maximum power out
- Alphanumeric names for memory channels
- Backlit keypad – a classy touch
- DTMF – ideal for Echolink
- Analogue volume control with proper on-off switch .
I like the way the display (and keypad) lights up when a signal breaks the squelch and stays lit for a few seconds after the signal has finished. If you have more than one handie in use this feature lets you know which radio received the call. My Wouxun also does that.
There are a lot of other things to like, such as the voice announcement (my ham rigs don’t have that) and the fact that accessories and spare parts being really cheap. The same computer interface cable works with both Baofengs and the Wouxun. Headsets and speaker-mics work with two Kenwood radios as well.
Judging by the comments of some buyers in the user groups, “Baofeng quality” is still an oxymoron. You are taking a chance that the radio you receive will not have any faults. Sending the set back to Hong Kong But if you are prepared to take that risk (or pay a bit more and buy from a local dealer) then the Baofeng UV-5R is worth a lot more than you pay for it.
 Gremlins Lurk in the Junk Heap
Three weeks ago my EchoLink station went deaf. Thanks to the West Central MN Amateur Radio Club’s antenna analyzer, I figured out right away that the problem was in the feedline/antenna system. Ever since then I have been either too busy or too nervous to go on the roof, so it has remained a mystery . . . until this afternoon.
Antonio, my son, went up on the roof with the antenna analyzer while I watched from the ground. He did a great job taking all the tape and coax seal off the PL-259, disconnecting the coax from the antenna, and hooking up the antenna analyzer to the antenna with a patch cord. “One point two!” he called down to me. There you have it — it was the coax! I realized what I’d done. Here I had some brand-new coax in my field-kit, but I ended up grabbing a different coil of junk coax and got bitten by a Gremlin. I found the new, already-terminated coil of coax and Antonio swapped it for the bad length, carefully wrapping the PL-259 with coax seal and rescue-tape. In short order we had the station back on the air.
All that, and Antonio doesn’t even get to use it yet. Hopefully soon! Antonio has been studying hard for his Technician exam this week. He is eager to take the test.
Thanks, Antonio, for getting the EchoLink back up and running for all of us.
 My New EchoLink Station: NØIP-R
[Update 6/8/12: The problem was the coax. Thanks, Antonio, for getting it fixed! (click here for story).]
[Update 5/16/12: Yesterday my EchoLink radio went deaf. For some reason the SWR has soared — the problem is with the transmission line and/or the antenna. Happily the antenna has a lifetime warranty, so if that’s the problem it won’t cost me anything. The hard part is getting at it!]
Finally! My EchoLink station, in the works for a month and a half, is on the air and on the Internet. If you want to give it a whirl, go right ahead! It’s listed as NØIP-R, node 695717.
The idea for this EchoLink station sprang from the SKYWARN class I attended a month and a half ago. I was lamenting the fact that Granite Falls, the city where I live, didn’t have access to the hub-and-spoke repeater system used by the Chanhassen office of the National Weather Service (click on the map to learn more):
So I asked Dean Herzberg, NYØI, if there were any plans to connect his nearby repeater to the NWS station with EchoLink. Dean replied, “No plans, but I would surely authorize the connection. I can’t, but you could!”
Um, me? It hadn’t dawned on me that I could do this myself. But once Dean gave me the nudge, I was off and running (or at least hobbling enthusiastically). I thought, hey, I already have a Linux/Ubuntu server running 24/7, and I have an old Yaesu FT-1500M in a box — all I need is an interface and a radio.
So I bought a RigBlaster Plug-n-Play USB interface from Ham Radio Outlet and a dual-band antenna off eBay from Edison Fong, hooked it all together and gave it the ol’ smoke test.
It worked! At first I just set it up on a simplex frequency and connected to the EchoLink test server, with the antenna propped up against the wall. That way I could work out a few bugs at low power and in relative privacy.
The whole thing went on the back burner for about a month due to other priorities, but finally I punched some coax through the exterior wall into my bedroom. That’s where the server has been for a couple years, so that’s where the station went (I have a very patient wife!). I terminated the coax with an SO-239 bulkhead connector mounted on a blank wall-plate. On the exterior of the wall I applied hi-tech IPORS caulking compound (Individually Packaged Orally Reconstituted Sealant, i.e. chewing gum!).
But I just couldn’t bring myself to mount the antenna up there on the peak of my gable. Part of it is because I’m slightly handicapped, but mostly it’s because I would rather give up my ham license than go to the edge of my roof up that high. NYØI to the rescue! I’ve written about Dean before on this blog. He’s a great guy who would give you the shirt off his back. Well, Dean came over a couple days ago and put up my antenna for me, then joined my family for lunch. He’s a MN State Trooper and I’m an ex-cop from the Twin Cities, so we had plenty in common to talk about.
I’ve had to fiddle with the settings in EchoLink to get it to work right, but it seems to finally be working great. The two hardest things to get right were decoding DTMF tones properly and keeping two repeaters from chasing their tails when EchoLinked. After finally figuring out the right DTMF settings, I nearly pulled my hair out trying to test them with my HT. Finally I realized that I was de-sensing my Yaesu FT-1500M every time I transmitted with my HT! When I went a block away, it worked fine.
Now the National Weather Service office can EchoLink directly to Dean’s repeater so that they can hear SKYWARN spotters here in Granite Falls. Alternatively we can link his repeater with the repeater in Madison, to which the NWS already EchoLinks during severe weather — all you have to do is punch in the right DTMF code, and my EchoLink station will dutifully link them up.
Now I just need to get a better smartphone so I can run that EchoLink app . . .
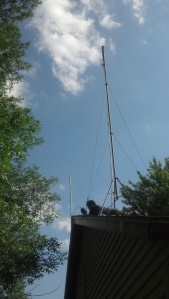
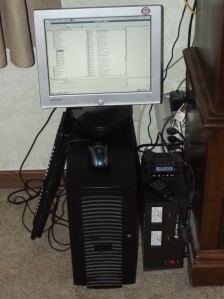
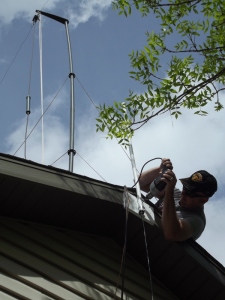
Here are some photos of Dean mounting my antenna and of the station itself:
 Handiham World for 09 May 2012
Welcome to Handiham World.

You can do it!
Today, just as we did last week, we are going to begin with Troubleshooting 101 as part of our initiative to help new ham radio operators (and even some of us older ones) learn how to do some basic troubleshooting for ourselves. Yes, it can be tempting to ask someone else to do things for us. This can become a bad habit when it keeps us from learning new things, especially things that we could – with a bit of practice – learn to do for ourselves. Knowing these basic things can serve us well in the future when no help is available.
Troubleshooting 101

Let’s get to today’s troubleshooting question:
I like using Echolink, and I’ve finally figured out how to forward the ports on my home router to my ham shack computer. The problem is that I can’t use Echolink on any other computer in the house unless I change all those port forwarding settings or use a public proxy, which isn’t always available. Is there anything else I can do to make Echolink a little more convenient?
Echolink is pretty addictive, and it’s easy to understand why you would want to be able to use it all around the house, perhaps even on your laptop while seated out on the patio one of these nice upcoming summer days. As you discovered, when you set up your home router to forward ports as described on the Echolink website, the application will then only work on the computer you selected. The router will happily direct traffic through those open ports, but only to that one specific ham shack computer. As you discovered when setting up your home router, port forwarding is not something you can do on a moment’s notice. You have to log into your router’s web-based administration page, go to the advanced settings, and then the port forwarding section. When you make changes to the settings, the router may momentarily drop internet connectivity and perhaps even reboot. Then it will take a while for everything to settle down and work again. This can be a major aggravation if you have other users in your household or if your home phone is a VoIP system that depends on the internet being connected.
Let’s examine our Echolink application’s built-in Firewall test. You will find it by opening Echolink, going to the “Tools” menu, and arrowing to the “Firewall/Router Test”. Once there, press
Since you have already told us that your ham shack computer has Echolink working, you should get this “Testing Complete” message that says “Firewall test results: PASS”. 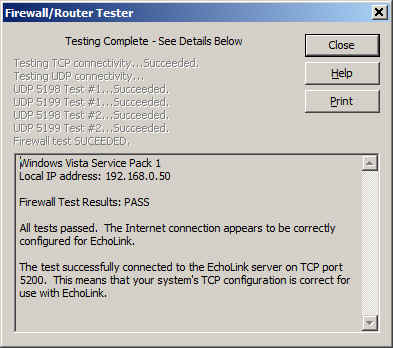
It is important to know about this handy little tool that is built into Echolink because you are going to use it again on a fairly regular basis once you make a few simple changes to your router settings.
Now it is time to use your main computer, which is connected by a LAN cable (preferably) to the router, to open the router’s administration page. Depending on your router’s setup, you will need to log in, then go to the advanced settings page and then to the port forwarding page. This should all seem familiar as you have already done it once. Next, you will need to uncheck the port forwarding boxes that you already set up. Yes, I know it seems crazy, but it is a necessary step. Save the settings, then go back to the advanced settings page and choose “port triggering” or “application rules” this time. It is similar to setting up port forwarding, but there is a BIG difference: You are opening ports when the Echolink application calls for them to carry traffic, no matter which computer on your network is running Echolink. This means that when you open Echolink on your wireless laptop while on the patio, the ports will be open to that computer. When you close Echolink on the laptop and later that evening you go back into the ham shack to use your main computer, Echolink will then work on that one because the ports will be opened by the “trigger” of a call for traffic to that machine.
I happen to have a D-Link router, so a screenshot of the application rules (triggering) page shows that I have triggered ports 5198 and 5199 for UDP traffic and port 5200 for TCP traffic. 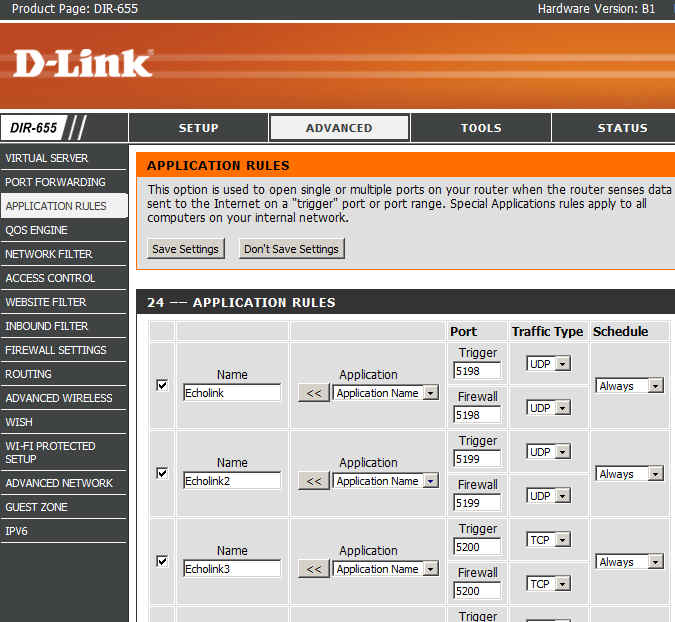
Now I can save the settings and after that I should be able to use Echolink on any computer on my home network without having to worry about port forwarding.
There are some things to remember:
- Only one computer at a time can be running the Echolink application. If more than one computer is running Echolink, only one of them will actually connect properly.
- When you close Echolink on one computer, it may take a few minutes for the network to resolve itself back to a neutral state. If you try to connect Echolink on another machine immediately, it may not work. Always allow a few minutes between switching machines – Both machines may be running and connected to the network at the same time, which is not a problem. It is only starting Echolink too soon after just closing it on another machine that can cause problems.
- This is where we try our built-in Firewall/Router tests again:

If the network is ready, the tests will proceed normally with a “PASS” and you are good to go for Echolink fun!
Email me at handiham@couragecenter.org with your questions & comments. But for the record, please remember that I am NOT tech support for Echolink or your home networking equipment since you are there at home and I’m here in Minnesota. Reading the manual will get you way farther than calling me for sympathetic head-nodding.
Patrick Tice, WA0TDA
Handiham Manager
 RFinder for iOS now available in the App Store

RFinder, the BEST repeater locator app on Android is now available in the iOS App Store. Bob has been working hard on getting approval for awhile now, and people like me who switched from Android to iOS have been waiting for this. If you’ve used any of the other available repeater apps and been disappointed, you really must try this one. Worth every penny at $9.99. If you’ve used Bob’s Android version you will be pleasantly surprised by the huge speed increase with the iOS release due to an upgrade to the database the app uses. Note to Android users: this will also speed up the original Android version on RFinder.
RFinder shows you all repeaters in your location in a selectable radius, or allows you to override the location for a custom search. Sorts by location, frequency, callsign, or displays on a map. Locates all repeaters in the database by band ( you choose which band or bands) 10M thru 1200. Corrections and additions can be submitted for paid users. Give it a try!
RFinder in the App Store. For iPhone and Ipad.
–Neil. W2NDG
