Archive for the ‘Uncategorized’ Category
 Digital experiments
In all my time in amateur radio I have never once experimented with microprocessor programming and I have done very little “digital” design. This seems to be a gap in my knowledge, although I am still not really interested, preferring RF design, especially QRP. I must say I remain very impressed with Wolf’s (W5OLF) tiny WSPR-AXE-CW beacon: this goes to show just how much can be achieved with so little physically. Maybe this is a whole area I should embrace? The trouble is it is impossible to be an expert at lots of things, unless you are very bright. Certainly I do not consider myself a polymath!
Speaking of FYBO
Falling sunspots?
Sunspot number today has fallen to 50, the lowest for quite a while and 10m propagation is forecast to be “fair” again.
Yesterday, 10m did open for me to the USA and plenty of stateside stations copied my 500mW beacon in the end after a late start. I suspect today it may be harder going as we seem, on average, to now be on the downward slope towards the next minimum, although this is years away. If predictions of the next maximum are to be believed, a SN of 50 would be considered a decent figure for the next sunspot peak! Of course, the predictions could be wrong, although the predictions have improved a lot and most got cycle 24 pretty accurately.
I have not yet turned on the 10m beacon this morning as we have visitors. It will probably be turned on just before lunch. I am still on MF but there are few active stations in range.
TX Factor Episode 7 Is Live
The long-awaited next edition of the UK-based HD TV show dedicated to amateur radio is now available at www.txfactor.co.uk
In this episode the team investigates the issues of recruiting young people to the hobby and visits a veteran amateur who’s an inspiration to us all! We discover what the IOTA programme has to celebrate and test an innovative 2 metre antenna which can be won in our next draw.
We hope you enjoy the show!
TX Factor Team
Here are 9 Great Ham Radio Podcasts
Over the last decade, I’ve listened to many ham radio podcasts and found them to be a great way to pass the time while driving or working in my home office.
Some of the best podcasts have come and gone, and some wax and wane on a regular basis as the host’s time permits (Jerry, we miss PARP!).
I put a list together of the eight podcasts that I listen to on a regular basis. Hopefully you’ll see one or two that you haven’t added to your list. Do you also enjoy listening to any of these great podcasts?
(And if I’ve missed a good one, please let me know in the comments!)

#1: ARRL Audio News


#7: Fo Time

#8: QSO Today

Building the M328 component tester (1)
This could prove to be a very useful piece of component test kit, for the constructor and repair bench, including the novice. It does, R, L, C including ESR, Diodes and Transistors, giving the pin configuration detail of the Semiconductor device undertest as well as the useful gain figures.
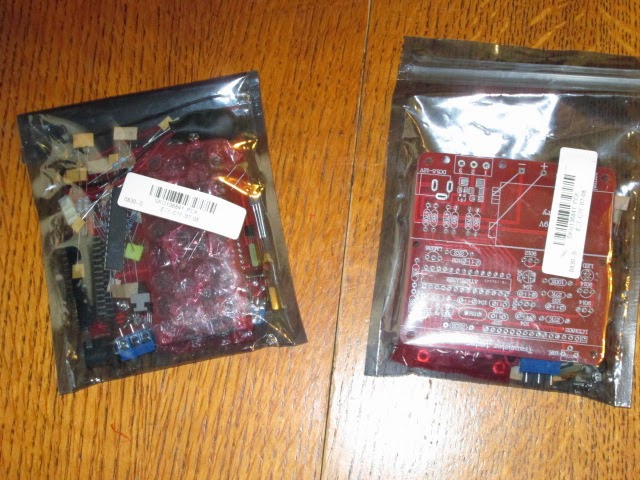
It is basically a copy of the Karl-Heinz Kubbeler design, centred around a programmable ATMEGA328 microcontroller which is very well documented. The kit took about 2 weeks to arrive from China, which contains a well made PCB, display module and all the components, including the blown main chip all for around £8.00 ($12 US). It comes with no instructions on how to put it together, but a Chinese manual is downloadable from the purchase site, which I will make a link available at the bottom of this Blog. Infact, really you don't need the manual for construction, as the component values are printed on the PCB, it just helps a little to get one or two things installed the right way around like the switch, and the circuit diagram can be useful for component reference and maybe fault finding later? Of course the Chinese manual is written in Chinglish, we are refered to welding not soldering! I don't think my old arc welder would prove very suitable for this project somehow? Hi!
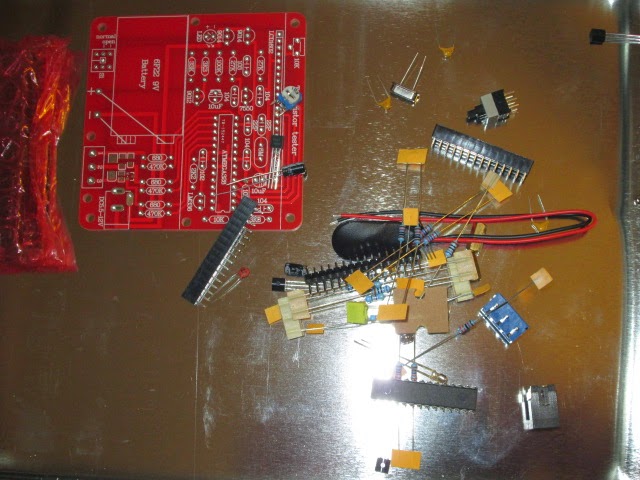
I emptied all the components out of their anti-static packet into an empty biscuit tin, so I didn't lose any of them. I was away, it took around 2 hours of soldering, and sorting out the correct values, a DMM can help with the resistors values, as I found an orange band can look like a red, so its best to measure them to avoid confusion and getting one soldered in the wrong position. Transistors are marked to board values, and the marking of the outline makes sure you cannot put the devices in the wrong way around.
At this stage it is time to check the board over for shorts, man made solder links etc, and snip off component ends. All looked ok, time to connect the 9V battery, before inserting the main ATMEGA IC, at this point a DMM is required to check for regulated 5V at the IC socket pins 7 & 22, all confirmed correct and the regulator was doing its job!
All in all it was quite a relaxing project to put together, I didn't find anything too difficult, although a bit of care is needed aligning up the pins of the main chip before pushing firmly home into its socket.
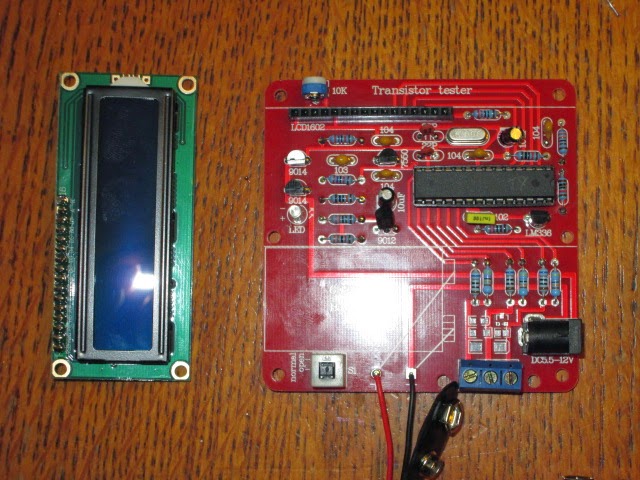
There is not much work to do with the display board as most of this is already constructed, just a strip of header pins that carefully require soldering in across the top of its PCB. This then mates up with the socket strip on the main board when it is pushed home and bolted together.
All looked good time to switch on! If it fires up correctly one push of the On button should turn on the display. In my case it did, and didn't? When I released the Push To Make switch, it went out ? Some folk have had problems putting the switch in the wrong way around, I knew I hadn't done this and a quick check confirmed the switch had been inserted correctly, time to investigate further? The clue was the LED under the display board wasn't on, a quick check with the DMM around the circuit in this area confirmed my thoughts, I had put the LED in the wrong way, huh! Oh dear! I had to pull it all apart, split the two boards desolder and turn the LED around, and then put it all back together.
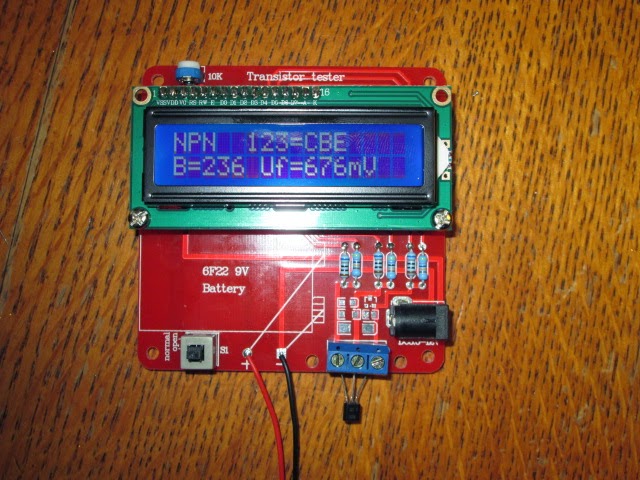
Great it then fired up correctly, and held in its On state after pushing and releasing the button, a quick adjustment of the contrast pot to get the display correct and all was looking well, time to calibrate..
To be continued in part 2.
References:
This is where I purchased the kit from, although they are available from ebay too:
http://www.banggood.com/DIY-Meter-Tester-Kit-For-Capacitance-ESR-Inductance-Resistor-NPN-PNP-p-929603.html
Construction manual:
https://www.dropbox.com/s/zpjwo3vfv9yfr5b/SKU136841%20M8install.pdf
Design manual helps with Calibration and other stuff:
www.mikrocontroller.net/attachment/143813/TTester_096k.pdf
Newer version of manual:
www.mikrocontroller.net/attachment/164956/ttester_eng104k.pdf
Where did the magic go?
I was a mere lad of 12 with a burning desire for knowledge. Our scout troop was in its infancy, I was only a second class scout working toward merit badges for 1st class scouting. I was also a den chief to a cub scout pack.
One of the merit badges I was working on was Morse Code. As luck would have it, there was a commercial pipeline company working on a construction project thru the county. Among the employees of this company was a radio operator. I don’t recall his name but he was a ham and our scout master had convinced him to help some of us with learning enough code to qualify for the merit badge.
After a couple of weeks of learning the code there were about 5 of us who were interested in learning more than just the code. We would regularly stay after the meeting to talk with this fellow about his hobby of “Ham Radio”. He would tell us about the equipment, antennas and discuss the most basic theory of operation. I was more than a little interested! A couple of the guys even bought receiver kits from Allied Radio to be able to listen to shortwave broadcasts. There was this one kid who’s folks had a good bit of money and he bought both a Space Spanner and an Ocean Hopper kit from Allied.
The Ocean Hopper was a 3-tube super regenerative receiver using a 35W4 as a rectifier and the audio complement was a 50C5 and a 12AT6 as an RF detector.You could purchase 5 plug-in coils to increase the coverage from 165 KHZ to 35 MHZ. There were connections for an external speaker the receiver also has pins for connecting headphones and a fahnestock clip to connect a piece of wire for an antenna.
The Space Spanner was a bit cheaper and only covered from 6-18 MHZ but this would easily cover all the commercial short wave frequencies in the 41 meter band as well as the ham bands of 40 and 20 meters. Utilizing the same basic circuitry as the Ocean Hopper the Space Spanner came with a built-in speaker and the 50C5 provided almost adequate output to hear weak stations. With either of these receivers a good antenna with a proper ground would provide hours of pleasure just listening to all this new world of information.
As the weeks wore on I began to keep saving part of my weekly allowance of 50 cents along with my earnings from doing chores for my grandmothers and cutting grass. My goal was to get the $15.95 price of the Space Spanner along with a couple of dollars for a soldering iron and a few hand tools.The wooden cabinet was an additional $2.90! With shipping costs from Allied the total cost for this rig would be just north of $20.00, quite a “princely” sum for a 12 year old kid who earned roughly $2.50 a week!
One night following our code lesson a couple of guys and myself were able to convince our instructor to let us see his “shack” as he called it. So off we went along with our Dads to see what this hobby called “Ham Radio” was all about! As we entered his home he directed us to a room to the side of the living room. Inside was the most complete compliment of radio gear I had ever seen! Not only did he have his ham station equipment he also had all this commercial gear for the day to day communications needs of the construction company as well. I remember watching him sit down in front of his ham station and flipping switches, turning knobs and all of a sudden the room was aglow with the illumination of vacuum tube radios!
I was absolutely speechless as the receiver came to life and the sounds of 20 WPM code came bubbling out of that massive 12″ speaker! He then tuned to 40 meter phone and proceeded to make contact with another ham in Arizona. Arizona! That was hundreds of miles from my small town home in Southern Kentucky, initially I thought no way! How could this box of wires, resistors, capacitors and tubes allow a fellow to speak into a microphone and talk to someone hundreds of miles away? Seeing our amazement he then performed a trick that I still to this day consider nothing short of “magic”. He took a small fluorescent tube, held it in his hand above his transmitter and closed the key. To my amazement the tube actually begin to glow! Needless to say I was “hooked” this was truly magic to me and from that night on I have been hungry for knowledge and more information about this scientific phenomenon!
Over the next few weeks the “rich kid” lost interest and I was able to secure the Space Spanner and the cabinet from him for 10 Bucks! He had botched the assembly of the Ocean Hopper and had thrown it away! Wow I bet I could have restored that one too but it was already in a land fill somewhere. I painstakingly followed the assembly directions and learned to read basic schematic diagrams while assembling the kit. I was a bit nervous when I finally got up the nerve to “throw the switch”. To my total amazement the little receiver came to life! Sounds like I had never heard before came out of that little 4-inch speaker!
That was 1957 and today at the tender age of 69 I still have that little receiver along with my first transmitter, a little 50 watt Heathkit DX-20. Once in a while I plug in a J-38 and turn this rig on just to enjoy how I felt back in the late 50’s as KN4MZW!
Although by today’s standards with the Internet, cell phones, tablet computers and instant gratification available at every turn, it’s easy to see that the hobby of “Ham Radio” isn’t nearly as mysterious. However, being able to call a friend across the oceans at will, have a long conversation while developing a lifetime friendship; all on a station that I assembled myself and did not have to pay an internet or cellular provider a single penny to accomplish, is still “Magic” to me!


