 |
 LHS Episode #253: JS8CALL Deep Dive
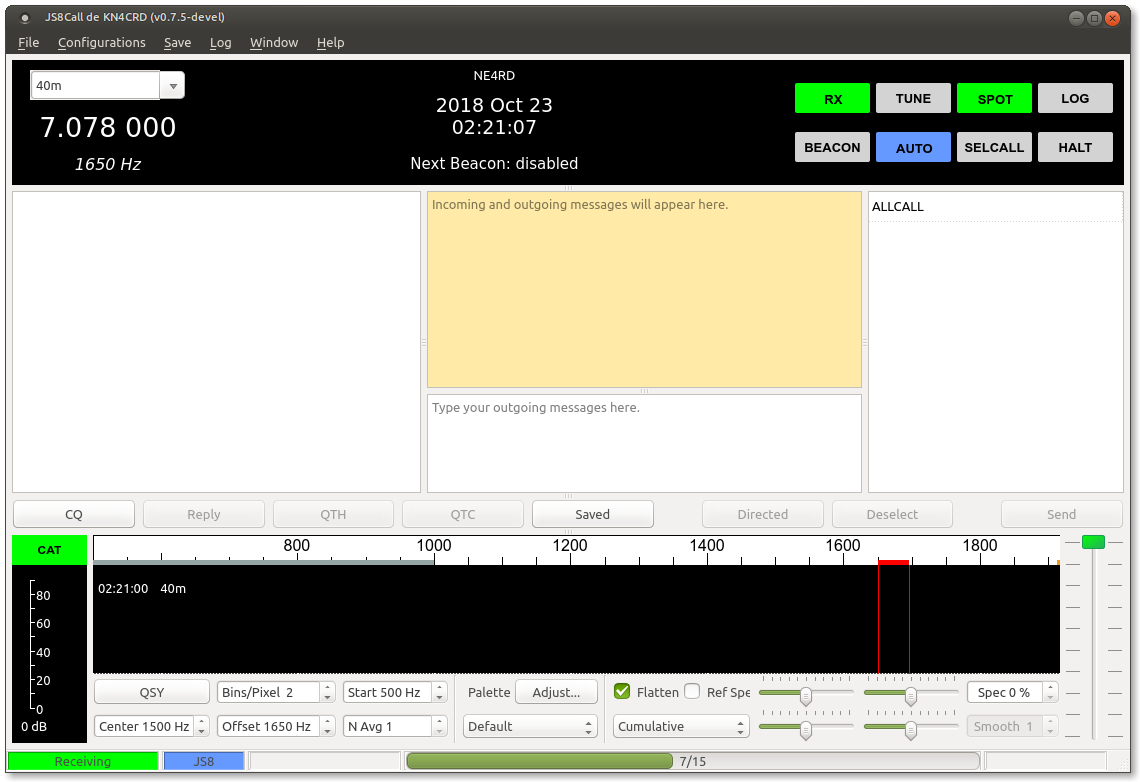 Hello and welcome to this episode of Linux in the Ham Shack! In our deep dive this time around, we take an in-depth look at the new weak-signal chat mode called JS8CALL, formerly FT8CALL. We explore the history and development of the mode, how it's currently being used, the team behind the project, the operation of the software and much more. Thank you for tuning in and thank you for supporting our program.
73 de The LHS Crew
Russ Woodman, K5TUX, co-hosts the Linux in the Ham Shack podcast which is available for download in both MP3 and OGG audio format. Contact him at russ@bluecows.com.
W3EDP Antenna
My QTH isn’t great for antennas. I’ve tried a few types but haven’t managed to find one that works for me, especially on the lower bands like 40m and 80m. About 2 years ago I made up a W3EDP antenna using some left over wire and a 4:1 balun. It was noisy and worse than anything else I had kicking about. So back in the box it went.
I thought I’d give it another go as domestic planning permission has been relaxed a bit. There are a few different configurations of the antenna but they follow a similar path. A long, not particularly resonant, antenna made up of a long element and a counterpoise.

In my case I followed the ‘ladder line method‘ where the antenna and counterpoise are as a single piece of ladder line for 17ft and the remainder antenna wire is just normal wire. So it looks like the original Zepp antennas and a little bit like this

The diagram above gives an additional component to the ‘normal’ W3EDP antenna. that is an additional counterpoise. I thought I’d give this a go based on a bit of background reading I did. NC4FB explains his experiences with the normal design and I have to say I had similar experiences. Namely that the swr was quite high and it was not that easy to get it down to usable levels on any of the bands when the antenna was first played with. A good idea to try my own extra’s.
So, test gear is as follows.
Antenna connected to homemade 4:1 balun with some mini 8 coax (about 7m) hanging outside a downstairs window. Antenna raised in a V shape with the balun box at ground level and the antenna supported about 1/3 of the way down on an aluminum mast approximately 8m off the ground. The end of the antenna is resting on the fence at about 1.8m off the ground. Hardly ideal but good for enough for a lash up.
I used a MR100 Antenna analyser. These are cheap and good for indicative measurements. There is also some good free software available to use with you Linux PC (There are probably windows varieties but I didn’t look).
I did 4 tests. Vanilla, i.e. no extra counterpoise. A 32ft counterpoise, A 16ft counterpoise & lastly an 8ft counterpoise. The outputs are below.


So what does this tell us?
Actually that there is a good argument on the face of it to add in an additional counterpoise. The 32ft one has a greater effect on the lower bands and the short on the higher bands. Nothing too contentious here then. So what happens if you connect them all up together.

It does lower the swr but that is probably not the only effect. I think this might need some extra experimentation or at least a bit more digging to see how to improve the antenna for my qth. But for now I’ll sort the lash up out and give it some on air testing.
Alex Hill, G7KSE, is a regular contributor to AmateurRadio.com and writes from Cumbria, UK. Contact him at g7kse@yahoo.co.uk.
Need Zone 2 on 40/80m, a Rare DX Contest Multiplier, or IOTA? VY0ERC Can Help!

It’s now October and throughout the northern hemisphere days are getting shorter, nights longer and the temperature is dropping. Consider then that as go you further north this happens in an ever more dramatic fashion. At the North Pole, the first and only sunset of the year happened on 21 September at the autumnal equinox. A scarce 1000 km south of that at 80 degrees north, there is still some daylight as the Sun reaches about 6 degrees above the horizon. That provides enough light to view the pristine environs of Ellesmere Island, around the Eureka Weather Station and the Polar Environment Atmospheric Research Laboratory (PEARL). The PEARL Site Manager and I made our first trip to Eureka in the Fall of 1994 and have repeated the long journey many, many times. Alexey Tikhomirov VE1RUS made his first visit to Eureka and PEARL in 2013, and has returned twice per year since.

Ellesmere is a large, mostly uninhabited island found just west of Greenland in the Canadian Arctic archipelago. It has one small community, Grise Fjord, at its southern tip, and two other notable locations, Eureka and Alert. Eureka is remote by any definition. It is accessible only by chartered aircraft and accommodation is limited and only available through the Eureka Weather Station by prior arrangement. It is an untamed landscape, that some might describe as bleak. It’s located on the northern shore of Slidre Fjord on the bank of Station Creek which is also the source of fresh water.
Looking out from there you see a hilly landscape devoid of trees, with a large ridge both to the east and west. Other than the weather station, humans have never established year round habitation this far north, although the Thule people did spend summers in the area. Remains of their camps are still visible many hundreds of years later. This part of the world does not give up its scars easily, it takes decades for vehicle tracks to fade away.

The vegetation consists of low willow shrubs and grasses and a surprising number of flowers in the summer time. By definition, this is an Arctic semi-desert with less than 30cm of precipitation per year. Many are surprised to hear that Eureka gets relatively little snow. However, as I like to say, “we see every snow flake that falls in the Arctic, and it’s usually going sideways!” Bad weather tends to take the form of high winds resulting in severe drifting in places. Winter time temperatures are typically well into the mid negative 40’s C January through into April, with -50C and lower always a possibility. At 80N, the Sun goes down for good on 20 October and is not seen again until 20 February. From mid April to mid September it is above the horizon for 24 hours a day. In addition to the Arctic weather, Eureka also is impacted by the Earth’s geomagnetic field. The geomagnetic pole is located something like 80 to 100 km east of Eureka, putting it pretty much dead centre in the auroral oval. This has the perhaps unexpected consequence that aurora are not usually visible from Eureka!
Both Eureka and Alert were established as part of the Joint Arctic Weather Stations (JAWS) through a partnership between Canada and the United States of America, in 1947 and 1950 respectively. In the early years, radio was the only means of communication and amateur radio was the means of handling personal communications between station personnel and their families in the south. John Gilbert, VE3CXL, among others served as radio operator arriving in 1956 for a two year stint. The story of those early years can be found in: “70th Anniversary of Amateur Radio at Eureka Part1: The original Station VE8MA” published in “The Canadian Amateur” the journal of the Radio Amateurs of Canada.

Consistent radio operations ended in Eureka sometime in the 1990s, and it was not until VE3KTB operated portable VY0 in 2014 that they resumed in a somewhat consistent fashion. In 2014 VE1RUS also operated as /VY0 and later met VE3CXL to talk about Eureka and the three agreed that it was time to re-establish amateur radio in Eureka in a more established fashion and so the Eureka Amateur Radio Club was formed with VE1RUS as the trustee of the station call, VY0ERC. The story of VY0ERC is described in “70th Anniversary of Amateur Radio at Eureka Part2: The VY0ERC Club Station” .
VY0ERC is currently located within the PEARL Ridge Laboratory (RidgeLab). PEARL is a comprehensive atmospheric observatory sampling various atmospheric parameters from the surface to over 100 km. It is operated by the Canadian Network for Detection of Atmospheric Change (CANDAC) a coalition of scientists from Canadian universities and government departments. PEARL has 3 facilities, the RidgeLab, the Zero Altitude PEARL Auxiliary Laboratory (0PAL) and the Surface Atmospheric Flux and Irradiance Extension (SAFIRE). Instruments located at the 3 PEARL sites include Fourier Transform Spectrometers to measure infrared radiance for determining trace gas amounts in the atmosphere, “Lidars” used to measure ozone and atmospheric particles, radars to measure cloud properties, air temperatures and air turbulence. There are also particle counters, UV spectrometers, a flux tower, and optical instruments that monitor the mesosphere. A more in depth description can be found at the CANDAC web-page, http://www.candac.ca. Being associated with a working and well equipped laboratory is very useful as many tools and supplies necessary for science tend also to be useful for amateur radio. Additionally, PEARL depends upon the most northerly situated geo-stationary satellite link for internet communications.

When VE1RUS and I are on-site, amateur radio activity at VY0ERC spans a wide range. HF SSB contacts can be made most days that the combination of time, weather, and propagation allow. Both are working on improving their CW and so we expect there to be more and more CW contacts. Digital modes, specifically RTTY and FT-8 are also both used. In February/March of 2018, the pair also put a number of grids on the air via FM satellite with contacts across the US and Europe via AO-91 and AO-92. This was made possible through a fund-raising campaign organized by Gabe AL6D and with the guidance of Patrick WD9EWK and encouragement of George MI6GTY. Gabe also offered the use of his TH-72 to make things easier.
One or both of VE1RUS and VE3KTB are on station for about 3-4 months of the year. Their operating schedule is driven mostly by the work schedule. It generally works out that the station is manned for many of the major contests such as CQWW SSB, CQWPX, ARRL DX, WAE RTTY, and usually one of either the IARU HF championship or the IOTA contest. Basically, any reason to get on and give out some contacts is considered a good reason! We are generally open for skeds if you drop us an email at vy0erc@gmail.com. Our non-contesting operating is always proceeded by a spot or two on the clusters.

The VY0ERC station consists of a TS-480HX, a Vectronix single 3-500Z amplifier (donated by Peter VE3AD) , a selection of antenna tuners and a wide range of antennas. The best band for contacts has generally been 20m, where a home-brew Aluminum tube Moxon rectangle is used, rotated by a HAM IV. A Cushcraft R5 vertical is also used on 20m-10m. It also makes for a good receive antenna on 40 and 80m! A variety of wire antennas have been installed and used with limited success on 40m and 80m. These include slopers, inverted V’s and flat-top dipoles, as well as a few other designs such as a full-size wire Moxon for 40m (not very successful) and a 40m half-square. The main challenge with these antennas is the lack of easily attainable height above ground. There are no usable structures other than the roof of the RidgeLab to use in supporting the wires. We hang the wires from a collection of PVC conduit strapped to the railings using bungee-cords. While very low-tech, this attachment method provides enough “give” in the system to allow the antennas to survive much longer than rigid systems in high-wind, heavy frosting and icing conditions. The weather has routinely destroyed each and every antenna put into service at the RidgeLab, despite our best efforts to remove them when we know there will be challenging conditions.

The inability to install low-band antennas at a sufficient height has led us to pursue a strategy of phased verticals for 40m and 80m. These verticals will either be telescoping, or mounted on tilting bases so that they can be quickly lowered –well quickly is relative in the cold of the High Arctic winter– when needed. As we all know, building an antenna farm is never inexpensive, but it is definitely rather more expensive when you factor in the transportation costs to the far north. In an effort to get a stronger signal on 40m and 80m, VY0ERC has initiated a campaign to raise funds to install a phase vertical array for both. You can read about it at www.gofundme.com/vy0erc-on-40-and-80m.
VE1RUS, VE3CXL, and VE3KTB invite any interested amateurs to join VY0ERC and participate in this Arctic Amateur Radio experience. Membership is free!
73!
Pierre VE3KTB
Alex VE1RUS
John VE3CXL
Pierre Fogal, VE3KTB, is a special contributor to AmateurRadio.com.
Monday’s ‘NRN’ CW Fun
 |
| My homebrew Ameco AC-1 clone |
A weekly CW operating activity that seems to be growing in popularity is the Monday “NRN”.
The NRN get-togethers are an offshoot of the annual “NRR” or Novice Rig Roundup. Monday’s “Novice Rig Night” gradually grew from those that wanted to see the NRR fun continue, in one form or another, without waiting an entire year for the event to roll around again.
Operating times run from sunup on the east coast to midnight on the west coast ... but basically, people just get on the air whenever they can on Monday and call “CQ NRN”. I suspect that most of the activity takes place between late afternoon and bedtime, with 40m probably seeing the most action. As winter arrives, we may see more activity on 80m but these are only my personal observations from the west coast.
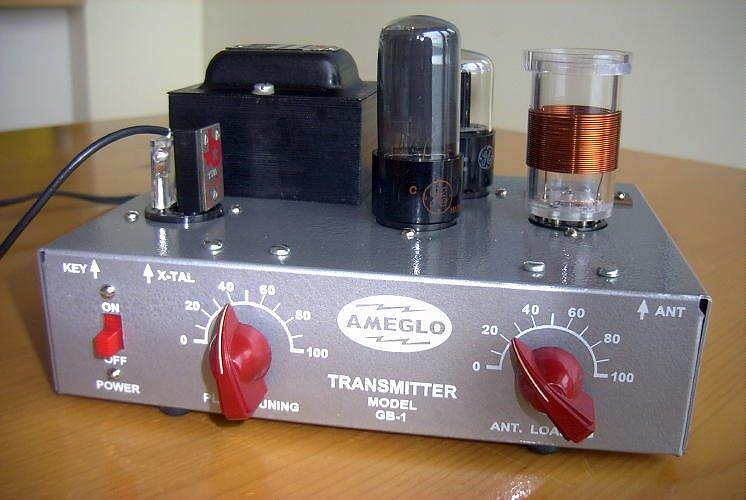
Most folks are using typical Novice-era transmitters and / or receivers, with the Drake 2NT, early Heathkits, Eicos, homebrews and Hammarlunds being popular. The previous Monday I was active with my homebrew Ameco AC-1 clone, a 6V6 crystal power oscillator, at about 6 watts out. Good contacts were had with several eastern stations. There are several AC-1s around and there has been at least one suggestion of an 'AC-1 Night' ... what fun that would be as well!
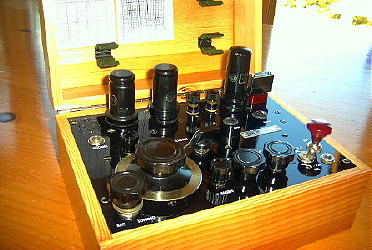
For last night’s NRN, I brought out my homebrew Paraset.
Once again, good contacts were had with the easterners on 40m: W9BRD in NJ, W3NP in WV, KD2E in NJ and VE3LYX using his No.19 tank radio ... two WWII radios talking to each other in 2018, one real and one a reproduction!
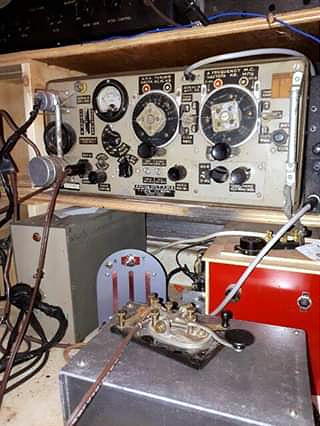 |
| VE3LYX's No.19 set operating position |

Here is the formal announcement for the Monday events, with a few additional details. Hopefully you can join the fun (any rig is fair game!), next week.
Steve McDonald, VE7SL, is a regular contributor to AmateurRadio.com and writes from British Columbia, Canada. Contact him at ve7sl@shaw.ca.
AmateurLogic 122: ALTV’s 13th Anniversary
AmateurLogic.TV Episode 122 is now available for download.
As one of the first video podcasts period, AmateurLogic.TV celebrates 13 years this month. Tommy builds the SDR Pi. Emile discusses the Internet of Cheap Old Things. George exposes Harmonic Distortion. Jim joins the party and shows us the interesting projects he’s been working on.
We announce the winner of our 13th Anniversary Sweepstakes. Sarah Clark, K4EMT will be receiving an Icom IC-7300 HF Transceiver, MFJ-4230DMP power supply, Heil Sound iCM microphone and BM-17 headset, MFJ ‘Big Stick’ antenna and RG8X coax, Gordon West amateur license study guide, and a pair of AmateurLogic Faux Gold PL-259 connectors. Thanks to Icom, MFJ, Heil Sound & Gordon West Radio School for making this possible.
1:51:14
George Thomas, W5JDX, is co-host of AmateurLogic.TV, an original amateur radio video program hosted by George Thomas (W5JDX), Tommy Martin (N5ZNO), Peter Berrett (VK3PB), and Emile Diodene (KE5QKR). Contact him at george@amateurlogic.tv.
ICQ Podcast Episode 278 – Hamfest 2018
In this episode, Martin M1MRB is joined by Matthew Nassau M0NJX and Bill Barnes N3JIX to discuss the latest Amateur / Ham Radio news. Colin M6BOY rounds up the news in brief, and this episode’s feature is - Hamfest 2018
ICQ AMATEUR/HAM RADIO PODCAST DONORS
We would like to thank Avi Solomon, Danny Robson (GM6CMQ), Brett Stalbaum, Gair Matthews (G1VWC) and our monthly and annual subscription donors for keeping the podcast advert free. To donate, please visit - http://www.icqpodcast.com/donate
- The Chill of Solar Minimum
- WW2 Allied Bombing Altered Ionosphere
- Rare Lizard Tracked by Tiny Radio Tags
- ARRL and FCC Discuss Uncertified Imported VHF/UHF Transceivers
- FUNcube Operations Update
- RSGB Past President GI3KYP SK
- EchoLink Now Connected to Irish DMR Network
Colin Butler, M6BOY, is the host of the ICQ Podcast, a weekly radio show about Amateur Radio. Contact him at info@icqpodcast.com.
 Ham Radio Deluxe |
 W5SWL Electronics |
 Ham Radio Prep |
 KB3IFH QSL Cards  Hip Ham Shirts  HamRadioAuctions HamRadioAuctions Reliance Antennas Reliance Antennas Enigma Shop Enigma Shop |  morseDX  Ni4L Antennas  R&L Electronics R&L Electronics antennas.us antennas.us Ears to Our World Ears to Our World |
- Matt W1MST, Managing Editor
