Posts Tagged ‘Uncategorized’
 Grinding quartz and holding a frequency during World War II
I’m a great fan of the Prelinger Archives which is home to so many items like this video I’ve heard about recently from various ham radio email lists.
I like how the components of the earliest electronics and wireless were so basic and ‘natural’. Think of hand made capacitors and resistors using traces of graphite on paper. Valves (or tubes) of course were another story but still capable of being ‘homemade‘.
I love the idea that an accurate, literally rock solid frequency could be achieved using a piece of a very common rock – admittedly a pure piece of quartz cut just so.
This video details the elaborate and meticulous manufacture of quartz crystals during World War 2 by Reeves Sound Laboratories in 1943.
The 41’24” video can also be viewed and downloaded via the Prelinger Archives.
Most of the ‘radio quality’ quartz was mined in Brazil which ceased its neutrality in 1942 and joined the Allies.
The story of quartz crystals during WWII is told in ‘Crystal Clear‘ by Richard J. Thompson Jr. (Wiley) 2011.

“In Crystal Clear, Richard Thompson relates the story of the quartz crystal in World War II, from its early days as a curiosity for amateur radio enthusiasts, to its use by the United States Armed Forces. It follows the intrepid group of scientists and engineers from the Office of the Chief Signal Officer of the U.S. Army as they raced to create an effective quartz crystal unit. They had to find a reliable supply of radio-quality quartz; devise methods to reach, mine, and transport the quartz; find a way to manufacture quartz crystal oscillators rapidly; and then solve the puzzling “ageing problem” that plagued the early units. Ultimately, the development of quartz oscillators became the second largest scientific undertaking in World War II after the Manhattan Project.” (from the book’s blurb)

 Reading in your head – the long path to morse code bliss
I’m one of those people who learnt morse code completely the wrong way. Starting off in the seventies with no guide I simply tuned into nightly morse transmissions sent by local hams at a very slow rate. I think they started at 5 words a minute. The main risk there was nodding off between words or impatiently guessing the wrong word.
Contemporary wisdom is that you should start listening at a much faster rate, say 15 or 20 words per minute. This is to prevent you counting dots and dashes in your head, and to make it easier for you to recognise the letters, numbers and even words by their sound.
Learning 15 wpm after mastering say 8 wpm is almost like learning a new language. Students of morse talk of ‘a plateau’ at 10 which is a mighty barrier to progressing up to a more useful conversational speed.
My personal goal is to be able to copy and send at 25 wpm and be able to sustain it over a couple of hours, and to be able to read mostly ‘in my head’, only using pencil and paper for details like names and callsigns.
Now that morse code is no longer compulsory for any ham licenses, surprisingly it seems to be more popular than ever! Especially with those hams who like to use low power to make contacts, or to take the lightest possible transceiver to a remote mountain top as part of the global ‘Summits on the Air‘ activity. Morse gets more mileage than voice per watt, and often these tiny transmitters are only putting out a couple of watts power.
And there’s something delightful in having the skill to read the beeps.
But for me it’s a skill I have to keep working on. I think in my twenties I was quite at ease chattering away at about 12 wpm seemingly for hours on end. Four decades on with a large slab of radio silence in between, I’m quite rusty, even though I know the basics are still there like riding a bike.
I’m a bit wobbly at the paddles, having grown up with the old fashioned straight key (the type you’re likely to have seen in old westerns). But you can feel slow but definite progress from every bit of practice you put in.
 JT65 – A new mode for me!
A few weeks ago, I decided to try JT65. I had been working a small amount of phone this year, along with a little PSK31. I liked PSK31 because I could watch a football game and work the quiet digital mode at the same time. I was curious about JT65 a few weeks ago, so I downloaded some software and decided to give it a try.
I’ll leave out all the history of the mode as it’s easy to find on the net. Basically it’s a digital mode, that’s great for low power operation. Originally developed for EME (Earth-Moon-Earth, Moon bounce) application, it’s very common to use 5-10 watts making contacts all over the world, depending on the condition of the bands. Information is sent over and over again to provide redundancy
JT65 is not a mode that anyone os going to rag chew on. The messages that are exchanged are very scripted and only 13 characters in length. I wondered for a while what practical use a series of 13 character messages would be, outside of making contacts simply for earning awards. I suppose you could use it when a short message has to absolutely get through. The software will repeat the message over and over again until you tell it to stop.
While there are a few software packages available for JT65, I chose to use WSJT-X. Another popular program that’s available is JT65-HF. WSJT-X will do both JT65 and JT9 but JT65-HF will only do JT65. I am finding that making JT9 contacts, works just like JT65, though the underlying protocols being sent over the air are different. JT9 uses much less bandwidth, and signals can be much closer together than JT65.
Messages are transmitted on alternating minutes. One station might call CQ. That message is sent for 46.8 seconds. There is a 13.2 second decoding period. The reply transmission is sent starting at the beginning of the next minute for the same 46.8 seconds. Again there is a 13.2 second decoding period and it all starts over again. One station ends up transmitting on the odd minutes, while the other station transmits on the even minutes. A normal JT65 QSO will last 7 minutes. The CQ station sends four messages while the station answering the CQ will send 3. Some stations that call CQ cut out of the messages making for a total of three sent for each station.
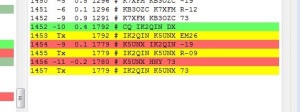
The following is an actual QSO that I had with a station in Italy, using 10 watts and a homemade buddipole.
The Italian station called CQ and I answered at 1453 UTC time. The entire QSO was over after both of us sent 73 messages! This is what almost all QSO’s are like.
Since I started JT65 in the middle of December, I have made 108 JT65 QSO’s and 19 JT9 QSO’s. I am slowly working on my basic WAS, trying to get most of the rest with JT65 or JT9. As of Dec 26, I only need 3 more states and I am determined to do it with JT65!
The following are some learning experiences and things I would pass on to anyone interested in trying JT65 for the first time.
While there might be other software packages, JT65-HF an WSJT-X seem to the be the two most popular, based on my reading on the Net and forum posts on eham.net and qrz.com. I would suggest downloading both and giving them a trial run before deciding. Regardless of which one you choose, I would highly suggest adding JTAlert. It’s a program that works with WSJT-X or JT65-HF alerting you to things like DXCC entities you need, states needed or WAS, stations you have worked before and many other things. I think it makes the mode more fun.
While PSK31 is a SSB mode, JT65 is not. It is an AFSK mode so you have to make sure you set your radio appropriately. Some articles don’t seem to mention this so some beginners miss this point. It does use USB like PSK31, but the modulation is different and the radio needs to be set properly.
I also ran into a configuration issue when setting up my Signalink USB for JT65. While working stations, I occasionally ran into an issue where the radio would key up and transmit, but nothing was sent out. No power on the power meter, nothing. I had set up the software to control my radio via CAT control. I found, after a lot of research, that my software was sending a PTT to the radio as was the Signaling USB. I suspect that when the software PTT got there first, that’s when the issue would happen. I set the software to VOX, letting the Signalink send the PTT and everything has been fine ever since. http://www.hamspot.org was a helpful resource to see if I was getting a signal out.
In the end, I am finding JT65 very enjoyable. It’s quiet so it does not bother my wonderful XYL. I can also do other things and not give the radio 100% attention. With JTAlert, it will tell me when someone is calling CQ or a needed state or country poops up. If you have not tried JT65 out, give it a shot and you might find fun.
 Big Soldering Irons & PL259’s
Like a lot of newer, more inexperienced hams, I have had a fair amount of trouble soldering PL259 connectors to coax. In my previous posts, about my portable station, I need some small coax jumpers to bring the antenna connectors down to the lower front of the box. That portion is not show in my posts yet, as I’ll write about that later when it’s done. I tried my 40 watt Weller thinking it would work, but it didn’t hold enough heat. I have come to realize that PL259’s are big heat sinks. They drain heat from the soldering iron tip, so you need something that can hold a lot of heat. Namely a larger tip on the iron.
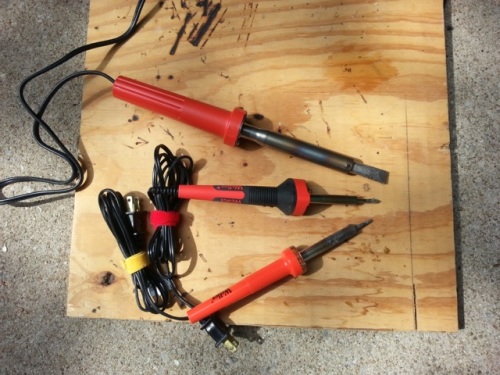
In the above picture, are my three soldering irons. The center one is a 25 watt model. It has a pencil type tip. No good for PL259’s but it’s good for other things. The bottom one is a 40 watt model with a small chisel tip. While the tip is larger, it’s still much too small. I know on ham forums on the Internet, there will be someone who will claim they can use this iron and successfully put on a PL259, but for most of us mere mortals, it’s not what we need for the job.
The upper iron in the picture is my new soldering iron. It’s a Weller SP120. It’s 120 watts with a huge tip as soldering irons go. I was able to put two PL259’s on and make a jumper cable in about 10 minutes. Most of that time was spent stripping the coax carefully with my x-acto knife. The right tools are sometimes needed and for me and soldering PL259’s, the right tool is a nice larger soldering iron!
73
 Lightweight portable VHF antennas
One of my favourite sites is Martin DK7ZB’s collection of pages detailing the construction of practical antennas for VHF and UHF.
I first visited the site following a link to designs for lightweight portable yagis that would be suitable for SOTA VHF activations. Under the link ‘2m/70cm-Yagis ultralight’, Martin describes a number of yagis for 2m and 70cm that use thin metre long aluminium welding rods mounted on PVC booms.
“These Yagis are constructed with cheap lightweight materials for electric installations and you can mount and dismantle them without any tools. The boom is made of PVC-tubes with 16mm, 20mm or 25mm diameter, the element holders are the clamps for these tubes.” DK7ZB
What makes the designs particularly attractive is that they can be quickly assembled from a compact (admittedly metre long for 2m) pack you can carry on your ascent, even designs using a 2 metre long boom.

The welding rods – used for TIG welding – are available in Australia in 2.8mm and 3.2mm diameters from welding supplies shops. I’m still on the lookout for 4mm diameter rods. PVC conduit and the mounting clamps are readily available in VK from hardware stores.
I’ve managed to cut a suitable slot in the end of a 3.2mm aluminium welding rod using a Dremel with a thin cutting wheel. One suggested way of attaching the feedline to the driven element is to crimp the lines into thin slots like this.
Also of interest to the portable operator are the J Pole designs based on Wireman 450Ω window feedline. There are dimensions for bands from 2m down to 40m. The J pole is essentially a half wavelength dipole where the high feed impedance is transformed by a quarter-wave length matching section (the tail of the J) tapped at a suitable distance to yield a 50Ω match. Follow the ‘Wireman-J-Pole’ link in the left navigation. These pages remind you that the J-pole can be configured in any way so a 40m J pole in a Zepp arrangement starts to look quite practical if you have just under 10m of 450Ω feedline available. I want to start with the 6m design and see if I can make it robust enough with heat shrink etc for portable work.
Kits for the DK7ZB yagi designs are also available from nuxcom.de, Attila Kocis DL1NUX’s website. Both sites are in German and English.
 Homebrew Buddipole
In a couple earlier posts, I wrote about making a homebrew Buddistick using Budd Drummand’s (W3FF) plans. His plans can be found on his page located here: https://sites.google.com/site/w3ffhomepage/.
I knew when I started building my station that I wanted a couple of portable antennas. I like making things, and decided to give his antennas a shot after deciding that I might be able to actually make an antenna that worked following Budd’s directions. I made the Buddistick first, then later made the Buddipole. Both are easy to make and work well. I use them both (not at the same time) for my main antenna right now, until I can get a full size dipole hung up, and coax run to the house etc. I am fairly new to the HF world and I don’t have my home station complete yet, so these antenna were a quick and easy way for me to get started on HF.
Pictured first are the components of the Buddipole. Starting at the top-left are the two 20 meter coils. To the right, the shorter coil set is for 15 and 17 meters. To their right is the “T” component for mounting the antenna on a painters pole. The black adapter changes the threads from PVC to the painters pole. In the middle are the two antenna whips, mounted in some CPVC with speaker wire coming out of the ends allowing for connections to be made to the whips. The bottom two pieces are CPVC arms with speaker wire running through them, and connectors.
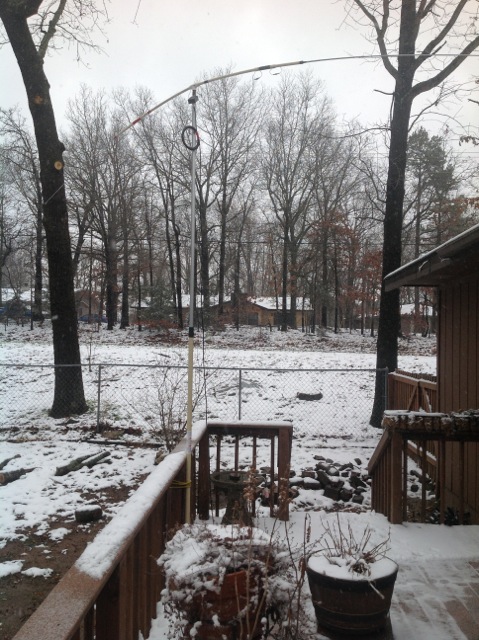
The following picture shows the Buddipole set up with the painters pole extended. The length of the extended painters pole in this picture is about 10 ft.
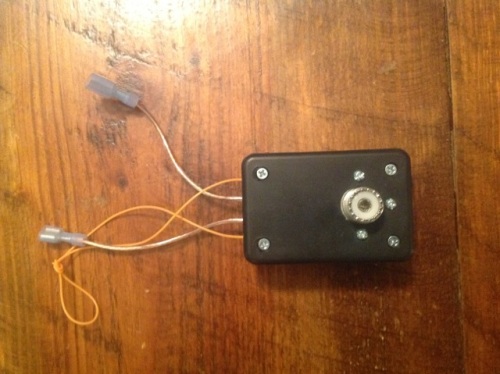
The plans that Budd published has the coax line ending with the spade connectors. I bought a piece of 50ft coax with PL-259’s installed already on both ends and I did not want to cut one of them off, so I made the following adapter. It is simply a small project box from Radio Shack, with a SO-239 mounted in it and speaker wires connected to the SO-239 center and ground. The orange line is old fly fishing line for hanging the box from the antenna. I use a velcro strip for this.
Here is a table that I made showing how I setup the antenna and the resulting SWR measurements. I think the higher SWR on 20 and 6 meters is due to the proximity of the metal eve troughs that the antenna is near with extended. If I orient the antenna parallel to the gutter, the SWR goes up. My house sits approx SW-NE so pointing the red end of the antenna North puts it at about 45 degrees to the gutter and the SWR goes down. This is the most convenient place to set up the antenna within reach of the radio inside allowing for the 50ft run of coax. The whip column is how many additional sections of the whip I need to extend not counting the 1 section length it is with all the sections pushed in. I think if I got this away from the house a few more feet, the SWR would come down on 20 & 6m.
| Band | Coil | Red Whip | Black Whip | Res Freq | Min SWR | Height | Red Orientation |
| 20M | 20M | 3 + 10 in | 5 | 14.175 | 1.5 | 12 | N |
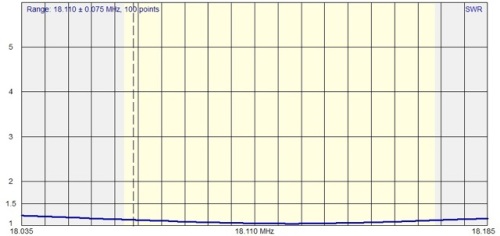
| 17M | 15/17 | 3 + 1.25 in | 5 | 18.127 | 1.06 | 12 | N |
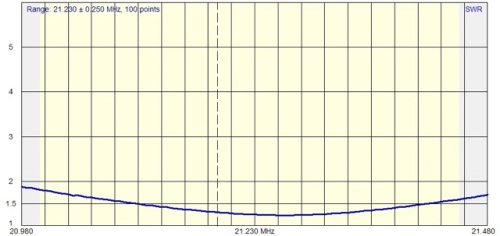
| 15M | 15/17 | 2 + 2 in | 3 | 21.250 | 1.24 | 12 | N |
| 10M | none | 4 + 5 in | 4 | 28.850 | 1.19 | 12 | N |
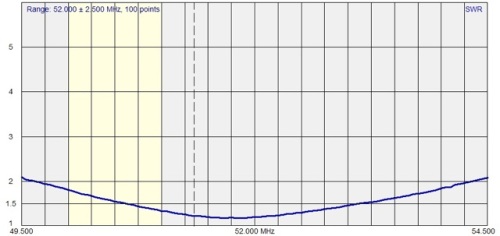
| 6M | none | 0 + 4.375 in | 0 | 51.850 | 1.2 | 12 | N |
I have made SSB and PSK31 contacts on 20, 17, & 15 meters. I have not made contacts yet on 10 or 6. Someday I’ll do that.
Below are the graphs from my antenna analyzer showing the antenna setup for each band in the table above.
20 Meter
17 Meter
15 Meter
6 Meter
Overall I am happy with the antenna. I don’t expect it to work like a full size dipole, but for the ease of setup and take down, it’s working for me. I have talked to South America, Europe and all over the US with both the home-brew Buddistick and Buddipoles.
My email address is on my QRZ.com profile. If anyone has questions, I’ll be glad to respond to any email.
 Homebrew Buddistick Project – Part 3
I have had a couple of comments regarding the 80m coil for the homebrew Buddistick. I had a few minutes today to set it up and try to get it tuned into 3.897.5 which is the frequency for the Arkansas Razorback Net. I think the 80m band might be difficult for this antenna. I was able to get it tuned to the right frequency with a SWR of about 1.4. But the low SWR “width” is not very wide. It won’t cover the entire 80m band without having to adjust the radial in or out. So I think this would be a very narrow bandwidth antenna on this low of a frequency.
This is the note I got from Budd when I asked about 80m to begin with:
The homebrew Buddistick works well on 80 Meters. Use PVC couplers to allow yourself to go to one inch OD for the coil. The coil length I used Is 11″. Use the same wire suggested for the other coils….insulated wire. Same gauge. If you wind 110 turns on that one inch form, that coil will be about 9 inches long. The single elevated radial will be about 66′ long and the wire should be stored on a kite line winder. This coil, with a Long Whip (9′) on top, should resonate on the bottom end of 80 Meters. Try that info and tell us where it resonates. Your final adjustments will be on the radial. If you want to go up to say 3900 MHZ, take some turns off the coil after you make your initial measurements.
Budd
So the narrowness of the SWR curve was expected. I did turn on my radio to see what I could hear, but tuning through the 80m band, I couldn’t hear anything. Not being familiar with 80m, I don’t know what kind of activity to expected at 4:3o in the afternoon. I won’t give up. I’ll work on it again but it’ll be a few days.
I am still happy with the homemade Buddistick antenna and my homemade Buddipole. I have also made the homemade Buddipole. I will write a post about that in the near future.
K5UNX
