Posts Tagged ‘Uncategorized’
 CW Ops Level 2 course
The last 8 weeks have seen me focus heavily on my CW with the CW Ops Academy. Around Christmas time I thought about signing up and then got off my back side and applied in early spring. The expectation was that I would be able to join in later on in the year as I’d understood it to be a busy course. Fortunately that was not the case.
So, with 8 weeks of CW laying ahead of me I’ve rather neglected many other things. But it has been worth every bit of effort. The course was run by Keith, G0HKC and had 3 other students. 2 from the UK and the other from Italy. The recommended 30 minutes of daily practice eluded me with all the usual distractions at work and home and I reckon I managed about 20 minutes on average. But even that saw my accuracy in receiving increase as well as the speed I could both receive and send. Additionally I can now head copy reasonably well up to around 20wpm which was impossible beforehand and we’ll above my expectations.
The ‘lessons’ were conducted over Skype twice a week for the full 8 weeks and gave us a chance to talk and compare notes as well as practice together. Keith was an excellent advisor and I will miss the lessons with him and my new CW friends. I have even dabbled in the CWT contests but the speeds are still a little daunting still.
Next up will be the level 3 after some more airtime. Look forward to sharing some slightly better CW from IO84. If you are looking to improve your CW then I can recommend the course entirely.
 There’s summat on the air now..but be quick
Recently I attempted a SOTA activation of Skiddaw G/LD-004. It is an easily accessible summit and a really good MTB route (called Back ‘o’ Skiddaw – although I’m not sure there is a link between the lake district and pirates but we’ll run with it). I’ve ridden it before but it has been a few years and the 17.5m route is straightforward and involves 2 out of the 4 lakeland MTB activities, these are of course:
- Riding – Sounds trivial but read on
- Pushing – Right its too steep / rocky / muddy. Get off and push the thing (generally up).
- Humping – Stage 3 is extreme. You have to carry your bike. It is very heavy after a few meters
- Throwing – This is the last resort and usually used in the summer when vegetation is everywhere. Pick up your bike and throw it on the bracken. Step into the flattened area. Pick up and repeat.
As I said the route is straightforward. The kit is standard….
- FT817nd
- LiPo – 3S 11.1v 2200mAh
- SOTAbeams SB270 (no longer available but a great antenna)
- VX-8GR APRS handheld
- Fishing pole
- End fed half wave antenna and ilertuner
- Palm paddle key
- 7m fishing pole
So imagine the scene. Dropped son off at cub camp and parked up. the sun is shining and the breeze is gentle. A good spring day. No need to check the high level weather forecast as you can see the summit. Assume its a bit colder and windier up top so pack a lightweight fleece.
Ride off. Enjoy the view. Here are a few photo’s


Nobody this way

Or that way…excellent

Windy, cold and rocky. makes riding fun (ish)

I kept my helmet on to keep the heat in
Whilst on stage 2 (pushing) up seat how (a lower summit and not a SOTA one) a fell runner was coming down with full kit on. To the untrained eye this might sound reasonable but as this is Cumbria it is rare to see a fell runner (because they are very quick generally, blink and they’ve gone…into the mist) and its even rarer to see one wearing a jacket. I was concerned. Sure enough the wind got stronger and stronger. Even though I was on the windward face I was shielded or in some kind of wind flow niceness. It didn’t last. Over the top of the ridge and it was howling and cold. Quick up the top and find a windless spot on the leeward side of the summit.
Skiddaw is a loose rocky summit that is old, as are all the lakeland summits and valleys for that matter but thats a whole new post. The summit might have been in a wind tunnel. 40+mph and around 3c. Not good when you’re in shorts. So on with the spare clothes and set up. No chance of HF today and VHF was going to be a quick one. I tried 2m USB but couldn’t keep the antenna straight so switched to FM and added more rocks to the support. No joy. I had to drop it to ground level and made do with the few contacts I made. Not what I planned at all.
There will be many morals to take from this experience. I like to focus on the positives and ignore the negatives, it helps block out the cold in this instance. So the main points…..
2 hours up……..10 minutes down…….great down hill section weaving around the many walkers who on the whole were much better behaved than they have been in the past. Just don’t touch the brake rotors for a while and keep them spinning. 
Next summit will be…….TBC
 Back in the loop
My main project for at least the last 12 months has been building a solid magnetic loop antenna and its companion automatic loop controller. I’ve been roughly tracking its progress at my magnetic loop antenna project page on this blog.
As usual, life has got in the way, but I want to get back on track and complete the project. To start pumping some RF current through it again, over the weekend I spent a short time playing with the loop on WSPR on 40, 30 & 20m. The tests were too brief but they certainly confirm that the loop is capable of transmitting a signal in spite of the fact the loop is only half a metre above ground and surrounded by metal garden furniture, a steel framed awning and gutters.
I used the WSPR Beacon android app to control my transmitter. There was some discrepancy (tens of Hz) between the actual output frequencies on the app and those shown on WSPRnet. I also found that tuning the loop to each WSPR frequency using the iP30 antenna analyzer was easy and the KX2 gave lower SWR figures.
The brief test became an exercise in understanding theWSPRnet results taking into account propagation and loop orientation which was aligned north-south.

This map view combines all 20 spots of the 1W VK2RH transmissions from grid square QF56oc. The first test was logged at 2017-05-07 01:36 UTC. (I’ve trimmed repeated info from the chart below to improve its fit on the page.)
| Time | MHz | SNR | Drift | Reporter | RGrid | km | az |
| 05:24 | 14.097001 | -15 | 1 | VK4ALR | QG56fk | 1151 | 356 |
| 05:24 | 14.097016 | -26 | 0 | VK4TDI | QG62lm | 733 | 14 |
| 04:48 | 10.140109 | -22 | 0 | VK4TDI | QG62lm | 733 | 14 |
| 04:48 | 10.140094 | -23 | 0 | VK7TW | QE37pc | 1057 | 198 |
| 04:48 | 10.140091 | -17 | 0 | VK6XT | OF86td | 3086 | 261 |
| 04:40 | 10.140095 | -27 | 0 | VK7TW | QE37pc | 1057 | 198 |
| 04:40 | 10.140090 | -4 | 0 | VK3WE | QF32se | 547 | 216 |
| 04:40 | 10.140090 | -22 | 0 | ZL1RS | RF64vs | 2069 | 101 |
| 04:40 | 10.140092 | -15 | 0 | VK6XT | OF86td | 3086 | 261 |
| 04:40 | 10.140091 | -16 | 0 | ZL3GA | RE66ho | 2130 | 126 |
| 03:18 | 7.040121 | -24 | 0 | VK3BAL | QF22mc | 711 | 230 |
| 03:18 | 7.040134 | -7 | 0 | VK3AXF | QF33fn | 516 | 235 |
| 03:18 | 7.040135 | -18 | 0 | VK4MOB | QG62ol | 734 | 16 |
| 03:18 | 7.040130 | -18 | 0 | VK3DXE | QF21nv | 720 | 228 |
| 03:18 | 7.040128 | -12 | 0 | VK2TPM | QF56of | 14 | 0 |
| 03:18 | 7.040129 | -14 | 0 | VK7DIK | QE38cu | 918 | 207 |
| 01:36 | 7.040183 | -16 | -1 | VK3AXF | QF33fn | 516 | 235 |
| 01:36 | 7.040177 | -16 | -1 | VK2TPM | QF56of | 14 | 0 |
| 01:36 | 7.040184 | -24 | -1 | VK4MOB | QG62ol | 734 | 16 |
| 01:36 | 7.040179 | -21 | 0 | VK3DXE | QF21nv | 720 | 228 |
40 metres favoured north-south, while 30 metres was literally an all-rounder and 20 metres was too brief. These results probably say more about propagation than the loop, not to mention the heavy lifting done by all the reporter stations extracting my down to -26 or -27 dB signals from the noise! Impressive all round!
I wonder how many people are using the Sotabeams WSPRlite antenna tester device. Certainly looks tempting, especially for longer term antenna evaluation.
In any case, the main purpose of today’s exercise was to re-start the loop project. The To Do list includes
- building & installing the SWR bridge into the loop controller,
- deciding on the best way to couple the stepper motor shaft to the tuning capacitor shaft,
- and wiring it all together with appropriate coax and control cables.
 Study Finds Anomaly with Amateur Radio Operators
Results from a study published by University of California Berkeley in The Journal of Psychology found that amateur radio operators are 45% more likely than the general public to believe fake news articles or material with misleading or outright wrong claims. Researchers weren’t specifically studying amateur radio operators, but discovered the correlation by accident. The report noted:
“We tested over 15,000 adult subjects and recorded profiles of each person… the common attributes like age, race, ethnicity, etc. and also their likes, dislikes, hobbies, diets, habits, etc. We discovered a strong and unexpected correlation with those claiming to be amateur or “ham” radio operators after running all of the data through an analysis using a recently developed Reverse Polish Bayesian algorithm. The unexpected data correlation continues to have the research team puzzled and further study is warranted.”
There is currently no proven explanation for the correlation, however one plausible hypothesis has emerged, that exposure to high levels of radio frequency energy combined with very fatty diets and long periods of television viewing, with political and news programming exposure, causing the frontal cortex of the brain to rapidly atrophy. Researchers are struggling to reproduce the characteristics as lab mice either die or become very disinterested when exposed to the combination of factors, especially when frequencies in the 3.5 Mhz range are used in experiments.
This article originally appeared in Radio Artisan.
 Portable Station Build – Part 3
I am sitting here watching the NFL playoffs and remembered that I never posted my final post about my portable station build. I completed the build last year. I say completed, but of course that does not rule out future modifications. I am a ham after all right?
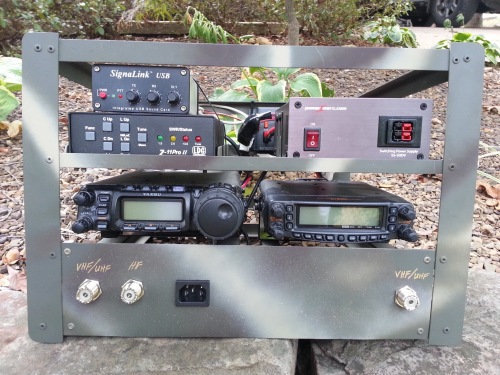
The major change from the last post to this one is the addition of a front panel on the lower portion that allowed me to add connectors for power and antennas easily in the front of the box.
There are two antenna connectors on the left for the FT-857D, one for HF and the other for VHF/UHF. The HF jumper actually is connected to the antenna tuner and there is another jumper goes to the radio. There is also a VHF/UHF connection on the right for the FT-8800R. The power connector I salvaged from a computer power supply and made a power cable that plugs into the Powerwerx power supply.
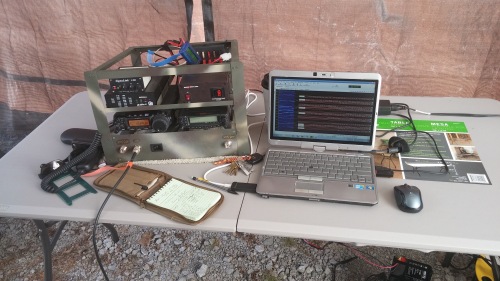
The last picture is the setup in action at Field Day. I was running PSK31 with my club on 20m and had a good time. You can see that the radio on the left is running and there is no power connector in the front. In this picture, I have a 35 amp/hour battery under the table feeding power into the RigRunner mounted in the back of the rack. I was able to run low power digital modes all day and into the night. I still had power left over when I went home.
I have been happy with the rack that I built. Lately I have thought about splitting the radios apart into their own rack as I have found that I don’t use both at once usually. There are also events where I need just the FT-8800R and don’t need the HF gear. Having the FT-857D along for the ride does give me a spare radio if something were to malfunction with the FT-8800 during an event I suppose. So for now, this is the result.
K5UNX
 CW Filter for my FT-857D
Last year I decided that I wanted to learn and use CW. To that end, I enrolled and completed the CW Academy Level 1 class with the CW Ops group (http://www.cwops.org/cwacademy.html). I have 2 CW QSO’s under my belt and I need to get on the air and make some more. Ion preparation for that, I decided to get the 500Hz CW Filter to add to my FT-857D. The radio has two slots for optional filters. Looking online, it seems the filters for the FT-857D are getting harder to find. I found one on INRAD’s web site and ordered one. It came a few days later and sat on my desk for a couple days. being Saturday and getting some things done, I decided to install it. I found it’s really very easy to install this filter.
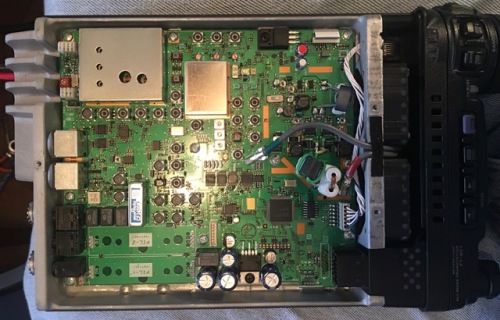
To start with, there are 7 screws that hold on the top cover of the radio. 2 on each side and 3 on the top. The labels are simply my way of remember where things go in the back of the radio while it’s in my portable rack.
After removing the cover the locations for the filters are in the back left corner, as shown in the lower left portion of the photo below.
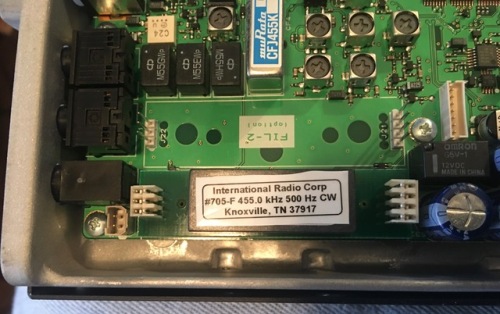
An up close look.
The filter is pretty easy to orient. There are 3 pins on one and and 4 on the other so it’s hard to get it backwards. There was also a reminder from INRAD that the circuit board went down and the label faces up. Here is after the installation which is simply pressed in.
After the installation, I wanted to make sure it was recognized by the radio so I powered it in and looked at the filter menu option and the 500Hz filter showed up as option B.
Now all I have to do is get on the air! When I do that, I will try to remember to make a video demonstrating how the filter affects reception of CW signals.
If you have a FT-857(D) and would like a CW filter for it, you might put this project on your list. I can imagine a day when these filters are really hard to find!
73!
K5UNX
 CQRLog CAT control for FT-857D
My last post, I talked about getting Linux setup for my new ham laptop. This is a short post to cover another small step in that process.
Tonight I was working on getting Rig Control working for my FT-857D and CQRLog on Linux. A lot of times, when I read posts like this, or watch youtube videos, people ignore the hardware side and just focus on the software side of things. I am going to try and cover both.
The hardware setup is simple. I am using the programing cable (CT-62B cable) that came with my RT Systems software to connect the CAT port of the FT-857D to a USB port on the laptop. Windows will see this cable a COM port, in my case, COM3 when I booted to Windows.
I found I had to install a couple things in Linux in order to get this working properly. When I intalled CQRLog, hamlib was installed along with it. I also had to install a package called libftdi1. When I look at the output of “dmesg” I see that the CT-62B cable shows up as ttyUSB0 which is the name of the serial port in Linux that I am going to use to communicate with the radio.
In CQRLog I set the following:
- RIG Model = 122 FT-857
- Device = /dev/ttyUSB0
- Serial Speed = 4800 (This is what the radio is set to)
- Check the box for “Run rigctld when program starts”
Everything else on the TRX control setup in CQRLog is set as default and not changed from the installed values.
One last Linux setting, in the /etc/group file, I had to add my user name to the “dialout” group. This can be done with the command usermod from a terminal. In openSUSE which is what I am running, I ran the command “usermod -G dialout k5unx”. I then logged out and back in and started up CRLog. When I opened the TRX control window the frequency matched what was one the radio and when I spun the radio dial, CQRLog changed with it.
More to come as I get up and running with Linux on my ham radio laptop.


